Sewing with bra cups can be a game changer when it comes to creating comfortable and supportive garments. Whether you're making a bra, swimwear, or even dresses with built-in bust support, understanding the basics of sewing with bra cups is essential. In this step-by-step guide, we'll walk you through everything you need to know to master this technique.
Understanding the Basics of Sewing with Bra Cups
Why Sew with Bra Cups?
Before we dive into the details, you might be wondering why sewing with bra cups is even necessary. Well, bra cups can provide added support, shape, and comfort to your garments. By using bra cups, you can enhance your curves, eliminate the need for uncomfortable underwires, and create a more customized and flattering fit.
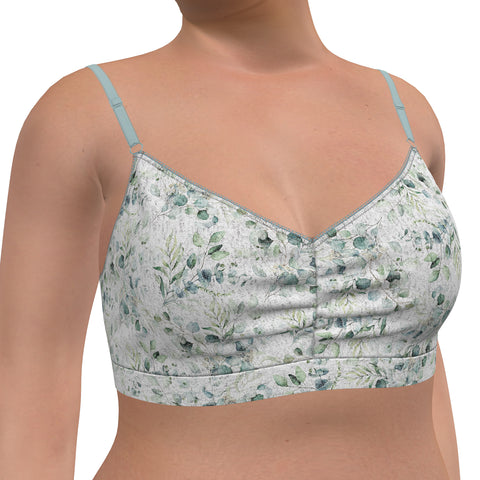
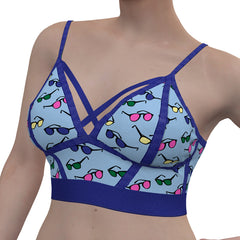
Sewing with bra cups not only improves the overall fit of your garments but also allows you to experiment with different styles and designs. Whether you're creating a stunning evening gown or a comfortable everyday bra, incorporating bra cups can elevate your sewing projects to a whole new level.
Additionally, sewing with bra cups gives you the freedom to choose the level of support and shape that suits your needs. With a wide variety of bra cups available in the market, you can select the perfect ones for your desired level of comfort and style.
Materials Needed for Sewing with Bra Cups
Before you get started, gather the following materials:
Bra cups: Choose high-quality bra cups that suit your desired level of support and shape. Consider factors such as cup size, padding thickness, and material. Stitch Love Studio offers a wide variety of popular cups styles for your project. Find your cup inserts here.
Fabric: Select a fabric that is suitable for your project, such as stretchy knit fabric for lingerie or swimwear. The fabric should be comfortable against the skin and have the necessary stretch to accommodate the bra cups. Find just the right fabric here.
Thread: Use a matching thread color for a seamless finish. Ensure that the thread is strong and durable to withstand the stress of regular wear. We have just the perfect thread for bras and lingerie sewing here.
Pins and clips: These will come in handy for securing the bra cups in place during the sewing process. Use pins to hold the cups temporarily and clips for a more secure grip.
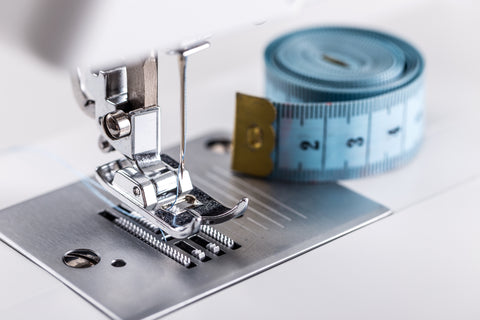
Sewing machine: Make sure your machine is in good working condition and equipped with an appropriate needle for the fabric you're using. A machine with adjustable stitch length and width settings will give you more control over the sewing process.
Scissors: Sharp scissors are essential for clean cuts. Invest in a pair of fabric scissors specifically designed for cutting through different types of materials without fraying or damaging the fabric.
Measuring tape: This will help you determine the correct placement and size of the bra cups. Take accurate measurements to ensure a precise fit and avoid any discomfort.
Optional: Elastic, hook, and eye closures for additional support. Depending on the design of your garment, you may choose to incorporate these elements to enhance the fit and functionality of the bra cups. You can find just the right hook and eye here.
Now that you have all the necessary materials, you're ready to embark on your sewing journey with bra cups. Let's explore the step-by-step process of sewing with bra cups to create beautifully fitted garments!
Preparing Your Bra Cups for Sewing
Choosing the Right Bra Cups
When it comes to sewing your own bras, one of the most important steps is choosing the right bra cups. This decision will greatly impact the fit and comfort of the final garment. There are several factors to consider when selecting bra cups, including size, shape, and desired support.
First and foremost, it's crucial to accurately measure yourself to ensure the cups will fit properly. This will help you avoid any discomfort or ill-fitting issues later on. Remember, bra cups come in different sizes, so taking precise measurements is essential.
In addition to size, you should also think about the shape of the cups and how they will enhance your bust. Some bra cups provide a natural shape, while others offer more push-up or plunge effects. Consider your personal style and the look you want to achieve when making this decision.
Furthermore, it's important to think about the level of support you need. If you are planning to engage in high-impact activities while wearing your bra, opting for sturdier cups will provide the necessary support. On the other hand, if you are looking for everyday comfort, softer cups may be more suitable.
Preparing Your Sewing Machine
Now that you have chosen the perfect bra cups for your project, it's time to prepare your sewing machine. Properly setting up your machine will ensure smooth and precise stitching.
Begin by threading the machine with a matching thread color. This will ensure that your stitches blend seamlessly with the fabric and create a professional-looking finish. Take your time and follow the machine's manual for the correct threading process.
Next, it's important to adjust the tension of the machine. Improper tension can result in loose or tight stitches, which can affect the overall quality of your sewing. Consult your machine's manual for guidance on how to adjust the tension properly.
Before starting on your actual project, it's always a good idea to test the machine on a scrap piece of fabric. This will allow you to check if everything is running smoothly and make any necessary adjustments before working on your bra cups.
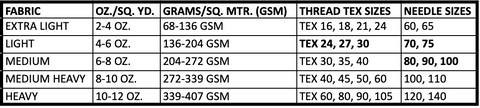
Lastly, double-check that you have the appropriate needle for your fabric. Different fabrics require different types of needles for optimal results. For knits, a ballpoint needle is generally recommended as it glides smoothly through the fabric without causing any damage. On the other hand, for woven fabrics, a universal needle works well in most cases.
By taking the time to properly prepare your sewing machine, you'll set yourself up for success when it comes to sewing your bra cups. Remember, attention to detail and thorough preparation are key to achieving professional-looking results.
Step-by-Step Guide to Sewing with Bra Cups
Are you ready to take your sewing skills to the next level? Adding bra cups to your garments can provide extra support and shape, giving you the confidence to rock any outfit. In this step-by-step guide, we will walk you through the process of sewing with bra cups, ensuring a perfect fit and a professional finish.
Step 1: Positioning the Bra Cups
Before you start sewing, it's crucial to determine the correct placement of the bra cups on your garment. To do this, measure your bust apex, which is the highest point of your bust. Mark this point on the fabric using a fabric marker or tailor's chalk.
Now, it's time to position the bra cups symmetrically on the fabric, aligning them with the marked points. If you are using a sewing pattern, follow the pattern markings for bra cup placement. Pay attention to the cup size and shape, ensuring they match your desired look. Once you are satisfied with the position, secure the cups in place with pins or fabric clips.
Remember, precision is key at this stage, as it will affect the overall fit and appearance of the garment.
Step 2: Pinning the Bra Cups
With the bra cups in position, it's time to pin them securely to the fabric. Start by ensuring that the cups are flat against the fabric and centered on the marked points. Adjust the position if necessary, ensuring a precise fit.
Pinning is an essential step as it will hold the cups in place during the sewing process. Take your time and use enough pins to ensure the cups stay put. If you prefer, you can also use fabric clips instead of pins, especially if you are working with delicate or slippery fabrics.
Step 3: Sewing the Bra Cups
Now comes the exciting part - sewing the bra cups onto your garment. Start by securing the cups with a basting stitch, using a long stitch length. This temporary stitch will hold the cups in place while you sew them permanently.
Switch to a regular stitch length and sew around the cups, following the cup's edges. Use a matching thread color to create an invisible seam. Take your time and sew slowly and evenly, keeping the stitches close to the edge of the cups. This will ensure a secure attachment and a smooth finish.
If you are unsure about the stitch length or tension, it's always a good idea to test them on a scrap piece of fabric before sewing on the actual garment. This way, you can make any necessary adjustments without risking the final result.
Once the cups are securely attached, trim any excess fabric or threads for a neat and professional finish. You can also use pinking shears or a zigzag stitch along the raw edges to prevent fraying.
And there you have it! By following these simple steps, you can confidently sew with bra cups, elevating your garments to a whole new level. Experiment with different cup sizes and shapes to achieve the desired look and fit. Whether you're creating a stunning evening gown or a comfortable everyday bra, sewing with bra cups will enhance your sewing projects and boost your self-confidence.
Troubleshooting Common Issues
Dealing with Uneven Stitching
If you notice uneven stitching while sewing the bra cups, there are a few possible causes. First, check the tension of your sewing machine. Loose tension can cause loose or uneven stitches, while tight tension can lead to puckering. Adjust the tension accordingly and test on a scrap piece of fabric. Additionally, double-check that the fabric is smooth and flat while sewing. Any wrinkles or folds can affect the stitching quality.
What to Do When Bra Cups Move While Sewing
If you find that the bra cups shift or move while sewing, try using fabric clips instead of pins to secure them in place. Clips provide a firmer hold and prevent the cups from shifting during the sewing process. Also, consider basting the cups by hand before using the sewing machine. Basting stitches hold the cups securely and minimize movement.
Advanced Techniques for Sewing with Bra Cups
Sewing Bra Cups into Different Types of Fabric
While the basic steps for sewing bra cups remain the same, different fabrics may require special techniques. For example, when sewing bra cups into stretchy knit fabric, you may need to use a zigzag stitch or a narrow three-step zigzag for added stretchability. On the other hand, woven fabrics usually require careful handling and precise stitching to achieve the desired fit and shape.
Creating Custom Designs with Bra Cups
If you're feeling adventurous, explore the possibilities of creating custom designs with bra cups. Experiment with different cup shapes, fabrics, and embellishments to add your personal touch to lingerie, swimwear, or even evening gowns. Whether you want to achieve a daring cut-out effect or a unique neckline, bra cups can be incorporated creatively to enhance your designs.
As you can see, sewing with bra cups is a versatile technique that can elevate your sewing projects to the next level. With a little practice and creativity, you'll be able to create comfortable and beautifully fitted garments that you'll love to wear. So go ahead and give it a try!
🥰 Keep in touch! Send messages, Share photos on Instagram @stitchlovestudio, comment, share your experiences.
✍ Sign up to receive news for events, freebies, coupons and sew much more!
]]>
A Tight History
The corset, also known as a stays or a pair of bodies, first appeared in the 16th century. At this time, it was a simple garment worn to flatten the bust and support the torso. These early corsets were made from stiffened fabric, such as linen or canvas, and were often reinforced with whalebone or reeds.
As the centuries passed, the corset evolved in both form and function. During the 18th century, the corset became more structured and boning was added to provide more support. The shape of the corset also changed, becoming longer and more conical in shape. This was known as the "long line" corset and it was a popular style for much of the 18th century.
During the 19th century, the corset took on a new level of importance in women's fashion. It became an essential part of the "hourglass" figure that was highly prized at the time. Corsets were made from a variety of materials, including silk, satin, and cotton, and were often adorned with lace and embroidery.
The 19th century also saw the introduction of the busk, a rigid piece of material, usually made of bone, that was inserted into the center front of the corset. The busk was used to help the corset maintain its shape and also provided a straight front for the garment.
In the early 20th century, the corset began to fall out of favor as women's fashion became more relaxed and practical. However, it made a comeback in the 1950s and 1960s with the rise of pin-up culture and the popularity of the hourglass figure once again.
Today, corsets are worn primarily for aesthetic purposes and as a form of lingerie. They have also become a popular accessory in the cosplay and steampunk communities.
Despite its controversial past and sometimes negative connotations, the corset remains an enduring symbol of femininity and beauty. Whether you wear one for fashion, historical reenactment, or just for fun, the corset is a testament to the creativity and ingenuity of fashion throughout history.
Not only are corsets a fun challenge to tackle, but they also offer endless opportunities for creativity and personalization.
The Skinny on Materials
Before we dive into the various materials used in corset-making, let's first discuss the basic structure of a corset. A corset typically consists of an outer layer of fashion fabric, an inner layer of stabilizer fabric, and boning to provide support and shape. Additionally, a corset may feature cups for added support and comfort, as well as channeling and hook and eye tape for ease of wear.
Now, let's break down each of these materials in more detail:
1 Channeling - Channeling is the fabric casing that encases the boning in a corset. It can be made from a variety of materials such as cotton, silk, satin, or a pre-made Nylon channeling you can find in our store. Channeling not only protects the boning from poking through the fabric, but it also creates a clean and finished look. We offer the softest channeling in a huge selection of colors.
2 Hook and eye tape - Hook and eye tape is a fastening system commonly used in corsetry. It consists of a tape with hooks on one side and eyes on the other that are sewn onto the back panels of the corset. The tape makes it easy to put on and take off the corset and allows for adjustability. Shop our selection of hook and eyes.
3 Boning - Boning provides the structure and support of a corset. It can be made from a variety of materials such as steel, plastic, or even bamboo. The boning is inserted into the channeling and sewn into place. Boning not only helps the corset keep its shape but also helps to distribute the pressure of the laces evenly across the body. An essential for the corset project. See out selection of boning here.
4 Stabilizer fabric - Stabilizer fabric is used as the inner layer of a corset and provides support and structure to the garment. It can be made from a variety of materials such as cotton coutil, twill or Nylon like what we offer. The stabilizer fabric helps to keep the corset from stretching out of shape and also provides a smooth base for the boning. A fan favorite stabilizer perfect for your corset project.
5 Cups - Some corsets may feature cups to provide added support and comfort. Cut and sew cups can be made from a variety of materials such as foam, silk, or satin. Or you can choose preformed cups. They are typically sewn into the fashion fabric and stabilizer layers of the corset. Many styles, colors and sizes of cups to choose from in our store.
6 Seam cover - Seam cover is a strip of fabric that is used to cover the raw edges of the fashion fabric and stabilizer layers where they meet. It creates a smooth and clean finish and can be made from a variety of materials such as bias tape, satin ribbon or delicate pre-made Nylon seam cover like what we stock. Check out our seam cover in a variety of colors to match your project.
All Together Now
While it may seem like a daunting task, breaking it down into manageable steps can make the process much more approachable. Here's the breakdown of steps in their most basic form.
1 First, start by selecting a pattern and fabric for your corset. The pattern will guide you through the construction process, while the fabric should be a sturdy material that will hold up to the tension of the corset.
2 Cut out your fabric pieces according to the pattern instructions. Make sure to mark all notches, darts, and seam lines to ensure accurate construction.
3 Next, sew the fashion fabric and stabilizer layers together along the seam lines, right sides facing each other. You can use a regular machine stitch or a flat-felled seam for added durability.
4 Sew the channeling onto the fashion fabric layer of the corset, making sure to leave a small opening at the top and bottom to insert the boning.
5 Insert the boning into the channeling and sew the openings closed.
6 Sew the hook and eye tape onto the back panels of the corset. Make sure to align the hooks and eyes accurately for a smooth fit.
7 Add cups to the corset if desired. These can be sewn in before or after the channeling and boning have been added.
8 Finally, add the seam cover to the raw edges of the corset to create a smooth finish.
9 Try on the corset and adjust the lacing to fit your body comfortably. If needed, you can make small adjustments to the fit by adding or removing boning.
And there you have it! By following these steps, you'll have a beautifully constructed corset that's ready to wear. While the process may take some time and effort, the end result is well worth it. Remember to take your time and enjoy the process - sewing a corset is a labor of love, and the finished product is a true masterpiece.
– Ciao for now!
🥰 Keep in touch! Send messages, Share photos on Instagram @stitchlovestudio, comment, share your experiences.
✍ Sign up to receive news for events, freebies, coupons and sew much more!
First let's look at the types of thread recommended for your knit garment based on fabric weight and garment type. It’s important to select the right type of thread to avoid the thread stretching too easily or having poor twist balance – which results in skipped stitches, open seams and poor stitching appearance.
You want to use a corespun or bonded nylon thread that has better ply security to avoid your thread from unravelling. Poly core or texturized poly threads should be used for basic seaming on most knit garments.
For performance or active wear, use a texturized poly or nylon thread. Wooly nylon threads for the bottom looper give coverstitch seams extra stretch.
The chart below compares some generic polyester threads – showing how you can get more elongation out of your thread/seams while balancing desired strength/performance.
Needles
Now let's move on to needle selection. Avoid using the wrong type and size of needle or damaged needles that can result in needle holes and runs in your garment. Ensure that the needle size and thread size are correct. If the needle is too small for your thread, it will result in excessive thread breaks.
For knit garments, you should be using ball point needles.
- Light warp knits: new round point
- General knits: thin or medium ball point
- Elastic: thin, medium, or heavy ball point
Point to Remember - The coarser the yarn is in the fabric, the heavier ball point needle is needed.
Here's a chart that you can use as a guide when selecting your thread Tex and needle size based on fabric weight.
Are you noticing puckering in your seams? There are 3 common reasons: Yarn displacement, tension puckering and feed puckering:
Yarn displacement – where the thread being used is too large for the weight of the fabric. Use the smallest thread size available that will maintain adequate seam strength/performance.
Tension puckering – where the thread tension is too tight. For any sewing project, you should use the minimum stitch tension possible to avoid skipped stitching which cause holes in the garment, thread breakage, and stitch cracking. The added stress to the thread with too high of tension can cause poor thread loop formation where the needle hits or misses the loop resulting in these issues. Generally, 5 to 7 times more tension is required on the needle thread than the bobbin thread. So set your bobbin thread to the lightest tension possible to set the stitch.
How can you test to see whether you have yarn displacement or tension puckering? Clip the thread between two connecting needle penetrations. If the tension is reduced, it’s tension puckering. If it’s not, it’s yarn displacement.
Feed puckering – when fabric plies are being fed into the seam at different rates. You’ll notice puckering on one side of the seam. A good test to see ply mis-matching – make 2 cuts in your fabric perpendicular to the seam where you’re noticing the most puckering. Remove the thread in the seam to see if the plies are the same length. How to solve – use minimum presser foot pressure. Use just enough pressure to prevent stalling.
Wavy seams? More differential action is needed on stretch knits to allow the seam to lay flat after sewing. What does this mean? The front should feed in more than the back is letting out. Adjust your differential feed (below the cloth plate on your sewing machine) to get the desired result and caution over stretching the fabric while sewing to have more consistent seam quality.
We hope these tips help you on your next knit sewing project!
Ciao for now!
– Submitted to Stitch Love Studio by Guest Writer, Lauren Famularo.
🥰 Keep in touch! Send messages, Share photos on Instagram @stitchlovestudio, comment, share your experiences.
👀 Check out or visit our Lingerie, Swimwear, Pajamas and Lounge Materials, Fabrics and Patterns at StitchLoveStudio.com.
✍ Sign up to receive news for events, freebies, coupons and sew much more!
📷 If you would like to use any of the photos from this blog, please credit us by adding the following information: "Image by StitchLoveStudio.com". Email me for additional information, requests or written permissions.
It's such a disappointment after purchasing a beautiful bralette in-store or online, just to find out that the fit doesn’t work. The truth is that many of the ready-to-wear, mass-produced bralettes on the market are less than perfect when it comes to fit– especially for small or larger bra cups. However, with a little bit of interest in embarking on a sewing journey, and finding a sewing pattern with a fit that works, bralettes can be made very quickly, and suddenly you'll have a closetful! According to the materials you choose and how inspired you get, you can end up with our own creation.
A word of caution: making bralettes can be addictive! Be prepared for making a few more for family, friends or even start your own business venture!
When we think about the versatility of a bralette, a few types come to mind.
Each one with its own “personality”:
The “So Comfortable” bralette
The cozy thought of getting home after a long day, changing into a favorite loungewear, removing the underwire bra, and reaching out for the cotton, modal, bamboo, tencel or any other soft fabric bralette to complete the experience. Ready to breathe deeper and sip on a warm cup of tea.
The ‘I’m Cool” bralette
Made out of unusual materials, usually velvet or even shiny foil prints. These are all different options that will serve as a layering piece, like wearing it under a jacket.
The “Romantic or Fanciful” bralette
Lace, lace and lace. Also can be combined with stretch meshes or shiny, sparkly fabrics.
The “Problem Solver” bralette
Tops, dresses or jumpsuits with a low back neck or sheer tops. These are all pieces that can layer on top of a nice lacey, or cool bralette. Any fashion stylist will agree!
The “Moody” bralette
It’s all about the prints! Tropical pineapple prints, cozy strawberry prints, funky bat prints, cute macaroon prints, superhero prints, dots, stripes, neon colors, pastel colors... you name it, they will all find the right fit.
The best news is that all of these aforementioned bralettes can be made with the same pattern! Just change up the material and you can have them all done, right before your next vacation or staycation, whatever you decide. I promise you, you will feel ahh-mazing knowing that you created it to fit just for you and your current mood.
Stitch Love Studio’s “Daisy” bralette pattern
The Daisy is a cute, comfy, easy to make and easy to wear lingerie piece. The long line bralette features adjustable straps and lined seamed cups. Daisy was carefully designed to be versatile and provide you with subtle support while lounging, playing, sleeping, traveling or just going out.
Instructions include variations for a lengthened version for a bustier style, or can be converted to a one-piece back for more comfort. If using a lower stretch fabric, follow the variation with hook and eye. Use a cotton or bamboo spandex blend knit fabric for a cute look, lace with a stretch mesh for a romantic style, or stretch velvet to wear under a low cut tee or jacket. Create endless combinations... Have fun!
The “Daisy” is available in a downloadable, easy to use, PDF chock full of easy to follow instructions, accompanied by colorful clear photos for every step, to guide you along in your bralette journey. Available in sizes ranging from XS-3XL.
Click here for more details about the "Daisy" Bralette pattern and more!
-Ciao for now! ❤️
🥰 Keep in touch! Send messages, Share photos on Instagram @stitchlovestudio, comment, share your experiences.
✍ Sign up to receive news for events, freebies, coupons and sew much more!
📷 If you would like to use any of the photos from this blog, please credit us by adding the following information: "Image by StitchLoveStudio.com". Email me for additional information, requests or written permissions.
Here are some tips to help you understand if your bra is fitting you correctly and how to find (or create) the right size bra to make you feel and look beautiful.
]]>
Undergarments should be comfortable and make you feel beautiful. Having the right fit should hide many of the lines in your clothes created by an ill fitting bra that is digging in and causing you that discomfort - giving you the right foundation for your clothes.
Here are some tips to help you understand if your bra is fitting you correctly and how to find (or create) the right size bra to make you feel and look beautiful. When putting on your bra - a helpful trick is to lift up your breast in a "scoop and swoop" technique to make sure your breasts are above the underwire by lifting from the side. Then smooth your tissue into the cup to let them settle.
Now, let’s review the fit!
1) Bra cups should sit flush to your body as well as the front space (center gore) between the cups. Cups should not gape at the top or cut into flesh.
If you notice that the cups are gaping at the top, opt for a smaller cup size. If your cup runneth over or the top edge is cutting in - go up a cup size. Remember a good fitting bra cup should be like a second skin over your breasts.
If you notice the center gore is floating above your breast bone (not flush with your skin), then check if your band is too big or your cup is too small. You may have to look at another bra style to get a better fit.
2) Underwire should surround the breast, not dig in or lift off the body.
If the underwire is lifting away from you / sitting on top of the breast or the underwire is digging into the breast - this is a sign that your cup size is too small.
3) The bra band should be parallel to the floor around the body. The band should be snug to support the weight of the breasts - this will reduce the weight/strain on the bra straps.
You can test the snugness by raising your arms and see if the band stays in place. If it rides up - size down. If it is cutting or painful - size up.
Tip: Start with the bra hooks on the outermost eyelets. This way as the elastic/fabric loosen over time, you can tighten the band increasing the longevity of your bras.
4) Shoulder straps should be adjusted so that straps are comfortable and stay in place (not digging in or falling off shoulders).
Tip: Wider straps and bra bands will disperse the weight over your shoulders and give more support for larger busts.
Hopefully, this will help those out there with fit issues. Ditch the old, ill-fitting bras and treat yourself to an upgrade in fit and comfort today! You're worth it.
Know any good fit tips and tricks? Share your bra fitting stories with me.
Ciao for now!
– Submitted to Stitch Love Studio by Guest Writer, Lauren Famularo.
🥰 Keep in touch! Send messages, Share photos on Instagram @stitchlovestudio, comment, share your experiences.
👀 Check out or visit our Lingerie, Swimwear, Pajamas and Lounge Materials, Fabrics and Patterns at StitchLoveStudio.com.
✍ Sign up to receive news for events, freebies, coupons and sew much more!
📷 If you would like to use any of the photos from this blog, please credit us by adding the following information: "Image by StitchLoveStudio.com". Email me for additional information, requests or written permissions.
My intention for this blog is to create a cozy home for sewing, patterns, and for making pretty things. We, as sewists, design and make lingerie, underwear, panties, jammies, lounge wear, swimwear, coverups, accessories, and more. Whatever we can dream up. With this blog I hope we can all share our making experiences, and have fun while creating our projects. Whether you're looking to make clothing or crafts for yourself, for a family member, a friend or maybe even start your own business– I will make myself available in any way possible. As our community grows we’ll have a place to laugh, cry, create, be proud, collaborate and learn from each other along the way.
Let me introduce myself to the community: I’m Lisha and I love sewing and pattern making. ♥️ I love everything about it! Ever since I was a little girl. I feel free and warm fuzzies inside when working with fabrics, laces, mesh, fancy elastics and beautiful materials. I want to to hear from those of you who get that same feeling!
When I’m not dreaming up my next pattern to create, I love cooking vegetarian foods...especially deserts, playing music, practicing yoga, playing with our dog, or reading up on and learning about anything new under the sun! For the past few years I’ve lived in Atlanta, GA (Marietta to be exact...just north of Atlanta) in the U.S.
Everyone needs a support network. Mine is my family and friends.
After working in the fashion industry for many years as a technical designer I’ve always had a longing, and felt like I needed to get back to my roots, being an entrepreneur, sharing. Helping fellow sewists drives me and inspires me. After many attempts at different business ideas we are happy to share Stitch Love Studio with you.
This is the beginning of something great! Join me! I’d love hearing from you and I’d love to know your story. Feel free to share, comment or ask any questions. I love to hear from you–my people.
Ciao for now!
🥰 Keep in touch! Send messages, Share photos on Instagram @stitchlovestudio, comment, share your experiences.
👀 Check out or visit our Lingerie, Swimwear, Pajamas and Lounge Materials, Fabrics and Patterns at StitchLoveStudio.com.
✍ Sign up to receive news for events, freebies, coupons and sew much more!
📷 If you would like to use any of the photos from this blog, please credit us by adding the following information: "Image by StitchLoveStudio.com". Email me for additional information, requests or written permissions.
Choosing the wrong material can be the biggest mistake when working with knit specific patterns❗⚠. I don’t recommend using just any stretch woven fabric (even if the word “stretch” is in the name) when your pattern calls for a knit fabric.
When I started teaching sewing classes, I realized just how important it is to start by recognizing and choosing the right materials.
In this blog post I’ll share with you a simple guide to the following:
Where do I start? How do I choose a fabric for my next project?
When creating a new garment with a new pattern, if you can, purchase enough of your final chosen fabric for trial garment and final piece. Keep in mind that you might have to make adjustments to the fit of the garment. However, if you use a scrap or decided to cut out an old t-shirt, make sure to compare the stretch and the weight to the final chosen fabric. To measure the stretch (lengthwise and crosswise) preferably use a stretch ruler (photo below) for the weight it will be more of a. If your practice fabric is too different from the one selected for the final garment it will drastically change the fit.
When selecting a beautiful fabric for your project, make sure the stretch and recovery, and the weight (💡Tip: When measuring the stretch, try not to pull to close to the edge of the fabric to get a more accurate reading and to prevent damaging the fabric).
What is stretch and recovery?
When you stretch the fabric and release it, it should spring back to its original state. If it doesn’t, it’s a cheap fabric that will not work for anything other than mopping the floor. Or maybe a shirt for the family pet?
2-way stretch vs. 4-way stretch:
2-way fabrics stretch in only one direction. 4-way fabrics stretch in both directions; lengthwise and crosswise.
How do I find the fabric that I’m looking for?
I hear and see this question in Reddit all the time. The process of making fabric is complex. The quality of the fiber content, and the process of knitting or weaving can lead to several different varying results (end product fabric). Before Googling or asking the one salesperson in the whole fabric warehouse, start by understanding the name of the fabric that you need for your project, by identifying the following 3 simple components:
To put it all together:If I’m making a t-shirt, I’d search for a Cotton Knit Jersey. If I’m making a sweatshirt, I might search for a Modal Spandex Knit French Terry. After you find a fabric you like, then check for fiber content percentage amounts (e.i Cotton 95%, Spandex 5%) and weight (approx. 4-7oz light weight, 8-10oz medium weight, 11oz + heavy weight for knit fabrics).
Some fabric selections for garments produced in my studio
Some of the most commonly used terms is when the fabric content becomes the fabric name: i.e. Cotton Spandex, which is missing an important part of the description (can you guess what it is?) The problem is that with these same fibers the fabric could be a variety of types: i.e. Cotton Spandex Tricot, Cotton Spandex Jersey, Cotton Spandex French Terry, and so on. I hope this helps clarify some of the fabric basics. 🤯 Whaaat❓
Before I start fabrics list, I’d like to address the bad stuff first: Polyester!. ☠ Most of those who know me, would know that I don’t wear or recommend Polyester. It is part of my mission not to carry materials with this fiber in our materials store (I might make some very small exceptions, depending on the company who manufactures it, and the percentage of it in the fabric content)
Polyester, and why I dislike it so much
Polyester is a man-made fiber, practically made from plastic using harmful chemical processes. It causes significant environmental damage, and It’s terrible for the skin. It doesn’t let your skin breathe, causing bacteria and bad odors- even if advertised otherwise as a “special” treated fabric, i.e. wicking. Unfortunately, since it’s cheap and widely available, Polyester is found in most athletic, sleepwear, underwear, and fashion garments.
Knit fabrics are made from knitting weft and coarse fibers or “Weft Knitted Fabrics” like Jerseys Ribbing, and they are made from a variety of fibers and in different weights. The quality is determined by density, quality, length of the yarns, and many other technical factors. They are super comfortable and many times soft, which makes them a great choice for making underwear, pajamas, loungewear and coverups. Most of the knit jerseys nowadays are made from a blend of natural, synthetic or manmade fibers, like Cotton, Bamboo, Modal, Tencel and Rayon with a small percentage of spandex, also known as elastane (or Lycra which is a trademarked brand). I like using medium weight jerseys, (about 8-10oz) for underwear and pajamas. For sports bras or leggings choose heavier fabrics (over 12oz) to prevent show-through. Myself and many others would highly appreciate it. Especially if you are going to wear a legging with a cropped top ✘.
Some of my recommendations are as follow, not only for fabrics, but also when purchasing finished garments:
Organic Cotton At the very minimum, I highly recommend using a light weight organic cotton jersey for the panty gusset lining. Or any other linings.
If you are looking for a luxurious, super soft jerseys for a nightgown or a nice underwear piece, I would choose blends of:
Modal (Trademarked brand) which will not pill or shrink, also it’s more water-absorbent than Cotton. Very soft to the touch and has a fluid drape.
Lyocell (or the trademarked brand Tencel) naturally wrinkle-resistant, natural and environmentally sustainable. Very soft to the touch.
Bamboo fiber besides being sustainable is also antibacterial, and antimicrobial.
Tricot Fabrics
It’s a different type of knitting process called Warp knitted. One of the nicest things about tricot is that it doesn’t fray! Tricots are widely used, and can be found in a variety of weights from very light weight fabrics, even sheer nylons like Glissenette, 20 Denier or Stretch Chiffon tricot to heavy weight like the Nylon/Spandex tricots for swimwear, active and athletic wear, leggings, bodysuits and dancewear. There are some interesting patterns and bright colors available in the market today. Many times they are smooth on one side and slightly textured in the other side. Always check for stretch percentages as some tricots like the 40 denier has very low stretch, about a 10-20% 2-way stretch. Tricot fabrics are durable and some of the Nylon/Spandex fabrics provide somewhat of a cooling effect. Some of my all time swimwear and activewear favorite brands is the Italian companies Carvico or Jersey Lomellina, many of their fabrics are made from recycled Polyamide, the quality is the best, and they provide a long list of testings (how they stand up in chlorine and saltwater, UV rays, etc.).
Lastly, there are also, some stretch and non-stretch woven fabrics that I would consider using for making pajamas, coverups, robes or some loose fitting lingerie. Like Stretch Sateen Cotton.
When it comes to making a bra, bralette, panty, pajama, loungewear or swimwear there are plenty of fabric options. From natural, sustainable fibers, synthetic, to innovative technology fabrics, choosing the right fabrics will completely change the look and the feel of any pattern.
My next Blog post will be Part 2 in this series on Fabrics– Stay Tuned!
Ciao for now!
🥰 Keep in touch! Send messages, Share photos on Instagram @stitchlovestudio, comment, share your experiences.
👀 Check out or visit our Lingerie, Swimwear, Pajamas and Lounge Materials, Fabrics and Patterns at StitchLoveStudio.com.
✍ Sign up to receive news for events, freebies, coupons and sew much more!
📷 If you would like to use any of the photos from this blog, please credit us by adding the following information: "Image by StitchLoveStudio.com". Email me for additional information, requests or written permissions.
]]>
Lace fabric or “Allover lace” are either stretch or non stretch, (stay away from Polyester as it will not be durable and it’s rough to the touch). Nylon Spandex or other blends are suitable for beautiful lingerie, underwear or even fashion details on lounge pieces or coverups.
Galloon or scallop edge laces are typically in a range of widths, they can also be stretch or non-stretch (sometimes called rigid lace) which can be used for cups and front bra frame, Pjs, or coverups. Do not use a non-stretch lace if stretch lace is called out in a sewing pattern, even if it has some give which is called “mechanical” stretch. I would always use lining in bras or bralettes, which could be a mesh or sheer cup lining.
Pay extra attention to the mesh quality, I've wasted a lot of time and money, trying to source a stretch mesh that meets my standards (I’ve been in the fashion industry for many years). Many of the light to medium weight mesh fabrics in the retail market have no recovery, and many times too much stretch, flimsy or they are rough to the touch (Do not use Polyester mesh), try to find Nylon or Polyamide/Spandex stretch mesh.
Some lace selections for garments produced in my studio
I typically use 3 different weights of stretch mesh:
Polyamide with at least 6% Spandex, specially used in small size bralette cups as lace lining to keep the sheer effect. (Can also use 15 Denier Fabric)
Works great as a liner or simply to make a sheer sexy piece, like panties or teddies. I’m very happy with the stretch mesh that I finally found for our store after an extensive sourcing effort, 4-way stretch mesh, 79% Polyamide and 21% Spandex.
A heavy weight stretch mesh ideal for sports bras, and any compression garment, bra base and back, and as lining in larger cups for better support. Keep in mind if using for the cups and base in a bralette, you will have to use a hook and eye or any other closure, as it won’t stretch enough to slip on the bra (lette).
Bra Tulle mesh: It’s a very light weight, with mechanical stretch (almost none). Or it could also have a very small percentage of stretch, usually 2 way stretch.
15 Denier stretch sheer nylon tricot (also known as sheer bra cup lining or Marquisette). Use this fabric as a bra cup liner under lace or other sheer fabrics only if you don’t need much support, small bra cups, bralettes.
15 Denier “stabilized” sheer nylon tricot fabrics (also knows and sheer cup lining) are commonly used for lining bra cups where more support is desired keeping the sheerness. It’s a non-stretch fabric usually used as lining in the bra front bridge, or any other area where reinforcement and stretch control is needed, usually at the center front as this fabric provides support without adding any thickness.
Be creative! mix and match fabrics, prints and colors, lace, mesh, or velvet, etc. Additionally, colors can change your mood at any given moment, keep this in mind when choosing patterns and colors, have fun!
Ciao for now!
🥰 Keep in touch! Send messages, Share photos on Instagram @stitchlovestudio, comment, share your experiences.
👀 Check out or visit our Lingerie, Swimwear, Pajamas and Lounge Materials, Fabrics and Patterns at StitchLoveStudio.com.
✍ Sign up to receive news for events, freebies, coupons and sew much more!
📷 If you would like to use any of the photos from this blog, please credit us by adding the following information: "Image by StitchLoveStudio.com". Email me for additional information, requests or written permissions.